How to Backup Your iPhone: A Comprehensive Guide
Having a backup of your iPhone is crucial to ensure the safety and security of your valuable data. Whether you accidentally delete important files, lose your device, or experience a system failure, having a backup can save you from losing precious memories and important information. In this detailed and comprehensive guide, we will walk you through the step-by-step process of backing up your iPhone, so you can have peace of mind knowing that your data is safe and easily recoverable.
Why Backup Your iPhone?
When it comes to the importance of backing up your iPhone, there are several compelling reasons to consider:
Protecting Against Data Loss
One of the primary reasons to backup your iPhone is to protect against data loss. Accidental deletion, hardware or software failure, or even theft can result in the loss of your valuable data. By regularly backing up your device, you can ensure that your photos, videos, contacts, messages, and other important data are safely stored and can be easily restored when needed.
Enabling Seamless Device Upgrades
Upgrading to a new iPhone is an exciting experience, but transferring all your data from your old device can be a hassle. By having a backup, you can seamlessly transfer your data to your new iPhone with just a few taps. This saves you time and effort, ensuring that you can start using your new device without missing a beat.
Facilitating Smooth Data Transfer to a New Device
Whether you're upgrading to a new iPhone or switching to a different device, having a backup makes the transition smooth and hassle-free. With a backup, you can easily transfer your data, settings, and preferences to your new device, ensuring that you don't lose any important information and can quickly get back to using your device the way you like it.
Choosing the Right Backup Method
When it comes to backing up your iPhone, there are a few different methods to choose from:
iCloud Backup
iCloud Backup is a convenient and easy-to-use method for backing up your iPhone. With iCloud, you can automatically back up your device wirelessly over Wi-Fi, ensuring that your data is always up to date and securely stored in the cloud. iCloud Backup includes your photos, videos, app data, device settings, and more.
iTunes Backup
iTunes Backup is another popular method for backing up your iPhone. With iTunes, you can connect your device to your computer and create a local backup. iTunes backups include everything that is included in an iCloud backup, but they are stored on your computer instead of in the cloud.
Third-Party Backup Applications
In addition to the built-in backup options, there are also third-party applications available that offer additional features and flexibility. Some popular third-party backup applications for iPhone include iMazing, Dr.Fone, and AnyTrans. These applications provide advanced backup options and additional functionality beyond what is offered by iCloud and iTunes.
Backing Up Your iPhone Using iCloud
iCloud Backup is a convenient way to back up your iPhone wirelessly. Here's how you can enable and use iCloud Backup:
Step 1: Check Your iCloud Storage
Before you start backing up your iPhone using iCloud, it's important to ensure that you have enough storage space available. To check your iCloud storage, go to Settings on your iPhone, tap on your name at the top, then select iCloud. From there, tap on "Manage Storage" and you'll be able to see how much storage you have available and what is taking up space.
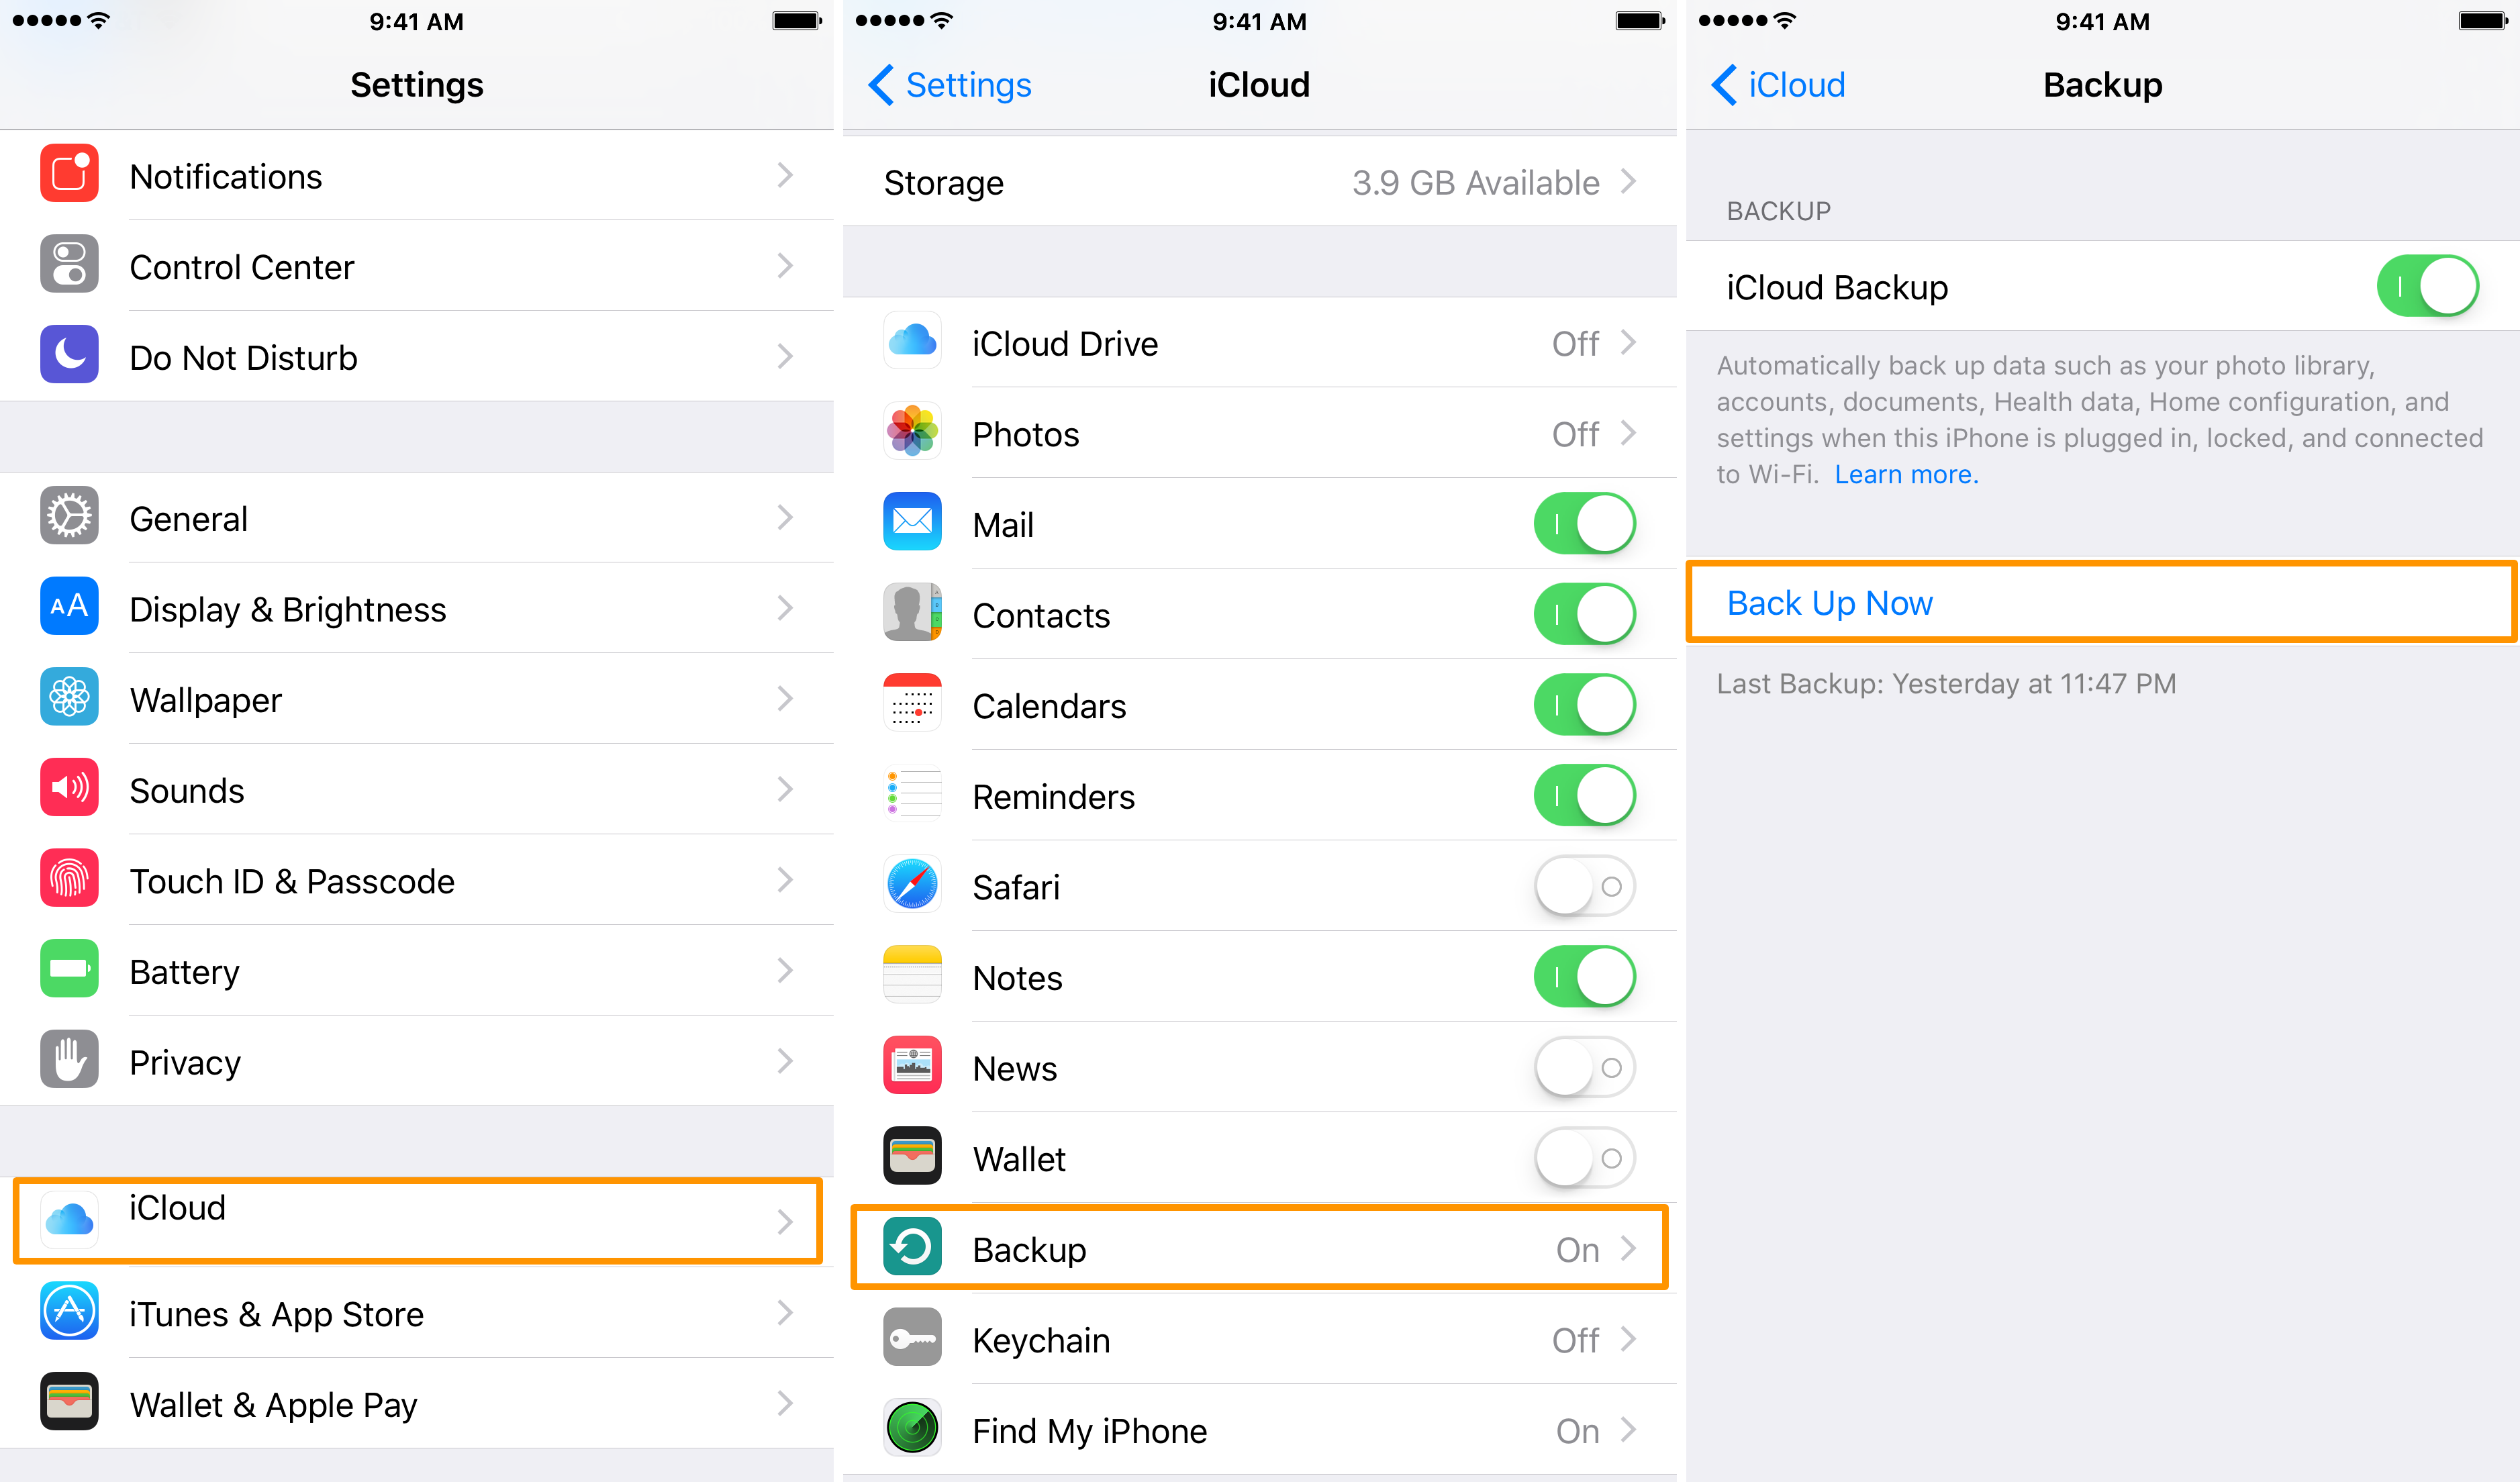
Step 2: Enable iCloud Backup
To enable iCloud Backup, go to Settings on your iPhone, tap on your name at the top, then select iCloud. From there, tap on "iCloud Backup" and toggle the switch to enable it. Your device will now automatically back up to iCloud when connected to Wi-Fi, locked, and plugged in.
Step 3: Back Up Your iPhone Manually
If you want to manually back up your iPhone to iCloud, you can do so by going to Settings, tapping on your name, selecting iCloud, then iCloud Backup. Tap on "Back Up Now" to initiate a manual backup. Keep in mind that the backup process may take some time, depending on the size of your data and the speed of your internet connection.
Backing Up Your iPhone Using iTunes
If you prefer to back up your iPhone using iTunes, follow these steps:
Step 1: Connect Your iPhone to Your Computer
Using a Lightning cable, connect your iPhone to your computer and open iTunes. If prompted, enter your device passcode or trust the computer.
Step 2: Select Your iPhone in iTunes
In iTunes, locate and select your iPhone. You'll find it in the upper-left corner of the iTunes window.
Step 3: Choose the Backup Method
In the Summary tab, under the "Backups" section, you'll find two backup options: "iCloud" and "This Computer." Select "This Computer" to create a local backup on your computer.
Step 4: Initiate the Backup
To start the backup process, click on the "Back Up Now" button. iTunes will then create a backup of your iPhone, including your settings, app data, messages, photos, and more. Keep in mind that the backup process may take some time, depending on the size of your data.
Third-Party Backup Applications
In addition to the built-in backup options provided by Apple, there are several third-party applications available that offer advanced backup features and additional functionality. Here are a few popular third-party backup applications for iPhone:
iMazing
iMazing is a comprehensive backup and device management application for iPhone. With iMazing, you can easily back up your iPhone to your computer, browse and extract specific data from your backups, and even transfer data between devices. The application offers a user-friendly interface and a range of advanced features for managing your iPhone backups.
Dr.Fone
Dr.Fone is another popular choice for iPhone backup and recovery. With Dr.Fone, you can back up your iPhone to your computer or iCloud, as well as recover lost or deleted data from your backups. The application also offers additional features like transferring data between devices, managing app data, and fixing various iOS issues.
AnyTrans
AnyTrans is a versatile backup and file management application for iPhone. With AnyTrans, you can easily back up your iPhone to your computer, manage and transfer your data, and even clone your device. The application offers a simple and intuitive interface, making it easy to navigate and perform various backup tasks.
Managing Your iPhone Backups
Once you have set up your backups, it's important to manage them effectively to ensure you have enough storage space and that your backups are up to date. Here are some tips for managing your iPhone backups:
Deleting Old Backups
Over time, your backups can take up a significant amount of storage space. To free up space, you can delete old backups that you no longer need. You can do this by going to Settings, tapping on your name, selecting iCloud, then Manage Storage. From there, tap on "Backups" and select the backup you want to delete. Tap on "Delete Backup" to remove it from your iCloud storage.
Checking Backup Sizes
It's a good idea to periodically check the size of your backups to ensure they are not taking up too much space. To do this, go to Settings, tap on your name, select iCloud, then Manage Storage. Under "Backups," you'll see a list of your backups and their sizes. If a backup is taking up too much space, you may need to delete unnecessary data or consider upgrading your iCloud storage plan.
Troubleshooting Common Backup Issues
If you encounter any issues with your iPhone backups, there are a few troubleshooting steps you can try. First, make sure you have a stable internet connection and sufficient storage space on your device and iCloud. If you're using iTunes, ensure that you have the latest version installed. If the issue persists, you can try restarting your device or computer, or even resetting your device's settings (but be aware that this will erase your device's settings and preferences).
Restoring Your iPhone from a Backup
If you ever need to restore your iPhone from a backup, whether it's because you got a new device or experienced data loss, here's how you can do it:
Restoring from an iCloud Backup
To restore your iPhone from an iCloud backup, start by erasing all content and settings on your device. Go to Settings, tap on General, then Reset, and select "Erase All Content and Settings." Follow the on-screen instructions to complete the erasure process. Once your device is erased, go through the initial setup steps until you reach the "Apps & Data" screen. From there, select "Restore from iCloud Backup" and sign in to your iCloud account. Choose thebackup you want to restore from, and wait for the restore process to complete. Your iPhone will restart and your data will be restored from the selected backup.
Restoring from an iTunes Backup
If you backed up your iPhone using iTunes, you can restore your device from that backup by connecting it to the computer that has the backup stored. Open iTunes and select your iPhone, then click on "Restore Backup" in the Summary tab. Choose the backup you want to restore from and click "Restore." Wait for the restore process to complete, and your iPhone will restart with your data restored from the selected iTunes backup.
Ensuring the Security of Your iPhone Backup
When it comes to backing up your iPhone, it's important to ensure the security of your backups. Here are some measures you can take to protect your iPhone backup:
Enable Encryption
Encrypting your iPhone backup adds an extra layer of security to your data. When you create an encrypted backup, your data is protected with a unique password that only you know. To enable encryption for your iTunes backup, simply check the "Encrypt iPhone backup" option when creating a backup in iTunes.
Enable Two-Factor Authentication
Two-factor authentication adds an extra layer of security to your iCloud account, making it more difficult for unauthorized individuals to access your backups. To enable two-factor authentication, go to Settings, tap on your name, select "Password & Security," and follow the on-screen instructions to set up two-factor authentication for your Apple ID.
Use a Strong Password
When creating a password for your iPhone backup or iCloud account, make sure to use a strong and unique password that includes a combination of uppercase and lowercase letters, numbers, and special characters. Avoid using easily guessable passwords or reusing passwords from other accounts.
Frequently Asked Questions
Here are some common questions and concerns related to iPhone backups:
1. Can I back up my iPhone without Wi-Fi?
Yes, you can back up your iPhone using iTunes without Wi-Fi. Simply connect your device to your computer using a Lightning cable, open iTunes, and follow the steps outlined earlier in this guide to create a local backup.
2. How much iCloud storage do I need for my iPhone backup?
The amount of iCloud storage you need for your iPhone backup depends on the size of your data. Apple provides 5GB of free iCloud storage, but this may not be sufficient for most users. If you have a large amount of data, such as photos and videos, you may need to purchase additional iCloud storage. Apple offers various storage plans to choose from.
3. Can I selectively restore data from an iPhone backup?
When restoring your iPhone from a backup, you have the option to restore all data or selectively restore specific data. For example, you can choose to restore only your photos and contacts, or only your messages and app data. This allows you to customize the restore process based on your needs.
4. Can I access my iPhone backup on another device?
If you have an iCloud backup, you can access it on another iOS device by signing in to your iCloud account and selecting the backup you want to restore from. If you have an iTunes backup, you can restore it on another device by connecting the device to your computer and following the restore process outlined earlier in this guide.
Additional Tips and Tricks
Here are some additional tips and tricks to enhance your iPhone backup experience:
Schedule Automatic Backups
To ensure that your iPhone is regularly backed up, consider scheduling automatic backups. This way, you don't have to remember to initiate backups manually. In the settings for iCloud or iTunes, you can set up automatic backups to occur at specific intervals or when your device is connected to power and Wi-Fi.
Optimize Storage Usage
If you're running low on storage space on your iPhone or in your iCloud account, consider optimizing your storage usage. This can include deleting unnecessary apps, removing old photos and videos, or using iCloud Photo Library to store your photos in the cloud and free up space on your device.
Regularly Check Your Backup Status
Make it a habit to regularly check the status of your backups to ensure they are up to date and running smoothly. This can help you identify any potential issues or errors and take corrective actions if needed.
Conclusion
Backing up your iPhone is a fundamental step towards securing your valuable data. By following this comprehensive guide, you now have the knowledge and tools to create a reliable backup system for your iPhone. Remember, accidents can happen, but with a backup in place, you can easily restore your data and get back to enjoying your iPhone without any worries. Whether you choose iCloud, iTunes, or a third-party backup application, take the time to set up regular backups and protect your precious memories and important information.
Posting Komentar untuk "How to Backup Your iPhone: A Comprehensive Guide"