Backup iPhone with iCloud: The Ultimate Guide for Data Security
Backing up your iPhone is essential to ensure the safety of your valuable data. With the advent of iCloud, Apple has made it easier than ever to securely store your photos, videos, contacts, and more. In this comprehensive guide, we will walk you through the steps to backup your iPhone with iCloud, ensuring that nothing is lost in case of unexpected incidents or device failure.
In today's digital age, our iPhones have become an indispensable part of our lives, holding a plethora of memories and important information. Imagine losing all your precious photos, contacts, and documents in an instant! By regularly backing up your iPhone with iCloud, you can safeguard yourself from such nightmares and have peace of mind knowing that your data is protected.
Understanding iCloud Backup
When it comes to backing up your iPhone, iCloud Backup is a reliable and convenient solution provided by Apple. It allows you to store a copy of your device's data on Apple's secure servers, ensuring that even if your iPhone is lost, stolen, or damaged, you can easily restore your data to a new device. Unlike other backup methods, such as iTunes or third-party apps, iCloud Backup offers seamless wireless backups that occur automatically when your device is connected to Wi-Fi and charging.
Benefits of iCloud Backup
There are several advantages to using iCloud Backup as your primary backup method:
- Convenience: iCloud Backup eliminates the need for manual backups by automating the process, ensuring that your data is always up to date.
- Accessibility: With iCloud Backup, you can access your backed up data from any device linked to your iCloud account, making it easy to restore your information on a new iPhone or iPad.
- Security: Apple prioritizes user privacy and data security, employing robust encryption protocols to protect your backup data from unauthorized access.
- Simplicity: Setting up iCloud Backup is a straightforward process, requiring only a few taps in your device's settings.
Limitations of iCloud Backup
While iCloud Backup offers numerous benefits, it's essential to be aware of its limitations:
- Storage Space: Each iCloud account comes with 5 GB of free storage, which may not be sufficient to back up all your data. Additional storage can be purchased, but it's important to manage your storage effectively to avoid running out of space.
- Internet Connection: iCloud Backup relies on a stable internet connection to upload your data to Apple's servers. If you have a slow or unreliable internet connection, the backup process may take longer or fail to complete.
- Selective Backups: iCloud Backup does not allow you to choose specific files or data to back up. It backs up your entire device, which means you may end up storing unnecessary data and using more storage space.
Enabling iCloud Backup
Before you can start backing up your iPhone with iCloud, you need to ensure that iCloud Backup is enabled on your device. Follow these steps to enable iCloud Backup:
Step 1: Check iCloud Settings
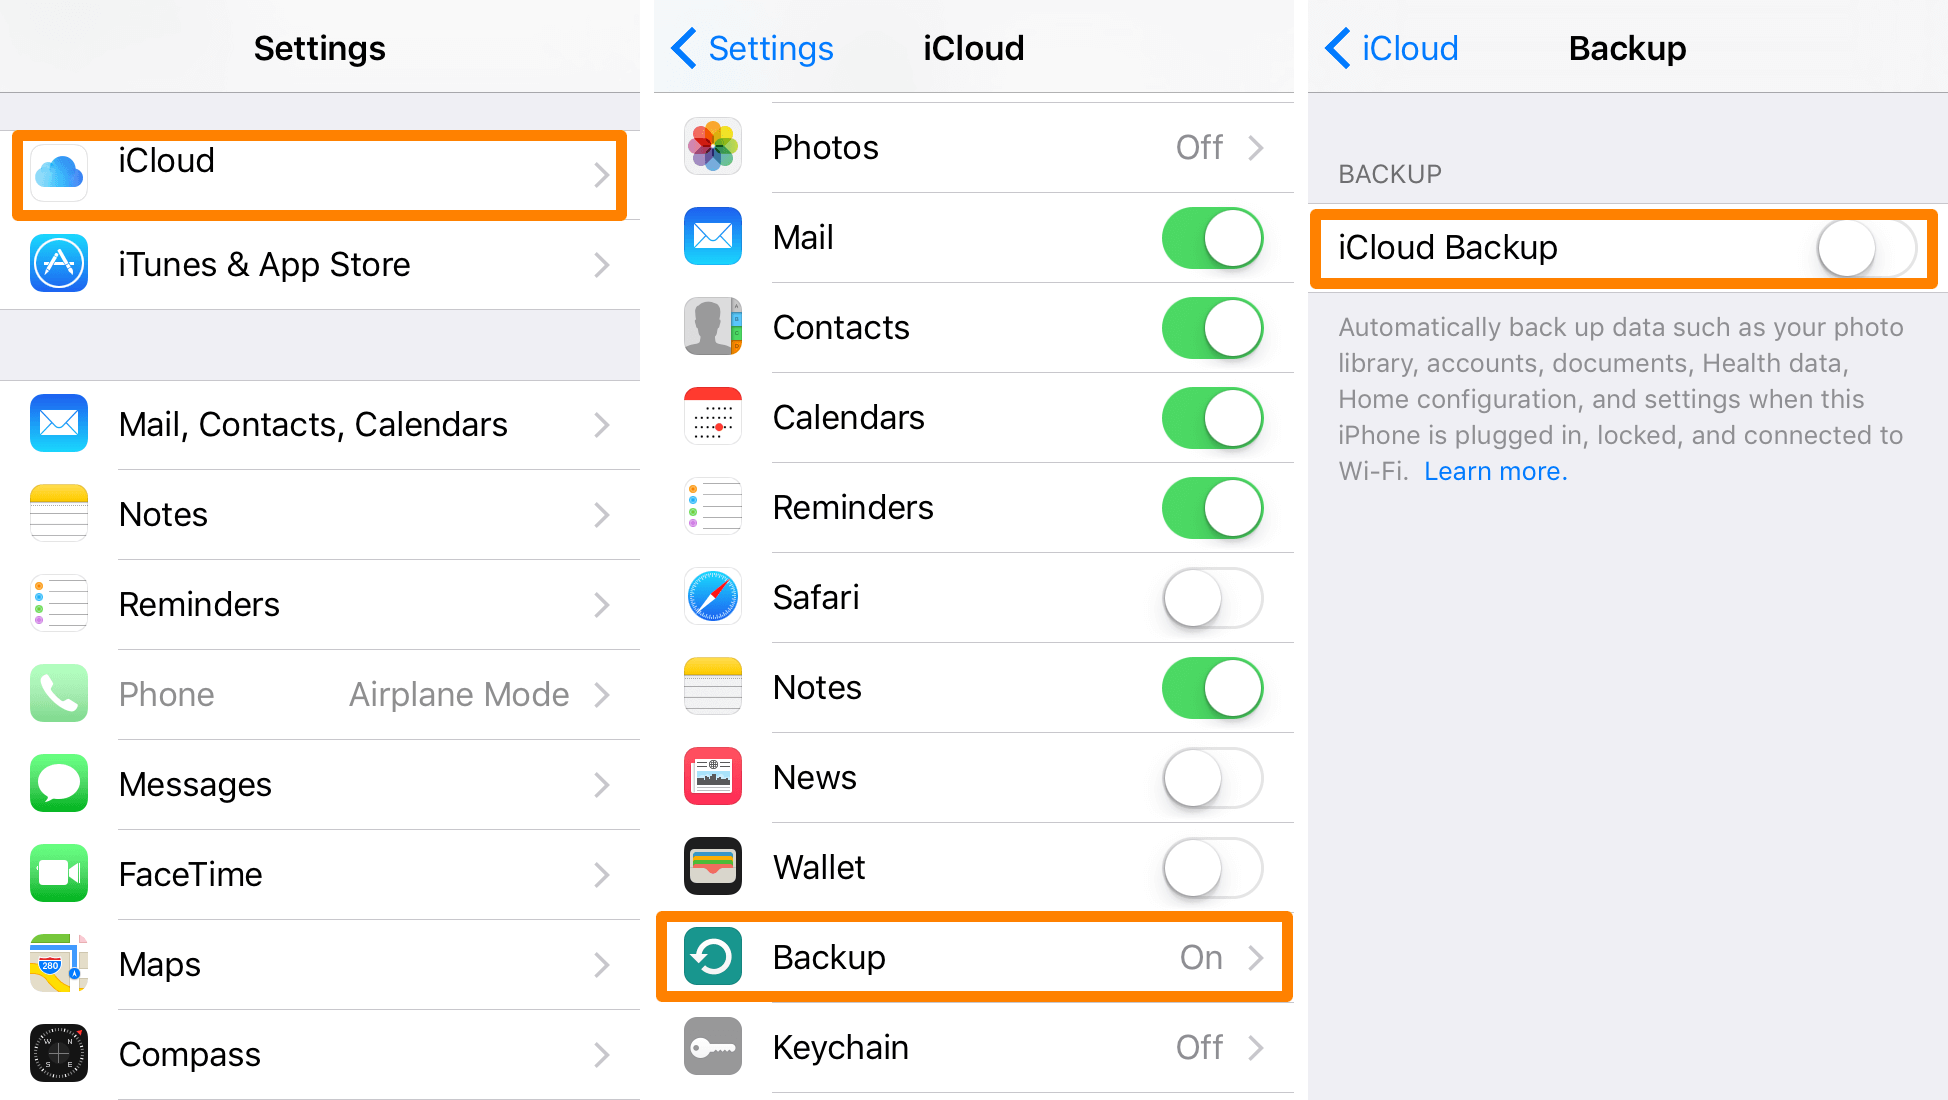
On your iPhone, go to "Settings" and tap on your name at the top of the screen. Then, tap on "iCloud" and scroll down to find "iCloud Backup." Make sure the toggle switch is turned on. If it's already enabled, you're all set. If not, tap on the toggle switch to enable iCloud Backup.
Step 2: Connect to Wi-Fi
To back up your iPhone with iCloud, you need to be connected to a Wi-Fi network. Go to "Settings" and tap on "Wi-Fi." Select a Wi-Fi network and enter the password if prompted. Ensure that your iPhone is connected to the Wi-Fi network before proceeding with the backup.
Step 3: Connect to Power
It's important to connect your iPhone to a power source while performing an iCloud backup. This ensures that your device doesn't run out of battery during the backup process, which could potentially interrupt the backup and result in incomplete data.
Step 4: Initiate the Backup
Once you have enabled iCloud Backup, connected to Wi-Fi, and connected to power, your iPhone will automatically initiate a backup. The backup process may take some time, depending on the amount of data on your device and the speed of your internet connection. It's recommended to leave your device connected to power and Wi-Fi until the backup is complete.
Checking iCloud Storage
As mentioned earlier, each iCloud account comes with 5 GB of free storage. However, this may not be sufficient to back up all your data, especially if you have multiple devices linked to your iCloud account. It's important to regularly check your iCloud storage usage to ensure you have enough space for your backups.
Step 1: Open iCloud Settings
Go to "Settings" on your iPhone and tap on your name at the top of the screen. Then, tap on "iCloud" and select "Manage Storage."
Step 2: View Storage Usage
In the "Manage Storage" section, you will see a breakdown of your iCloud storage usage. It shows how much storage is used by each app and data category. This information helps you identify which apps or data are consuming the most space.
Step 3: Free Up Storage
If you find that your iCloud storage is running low, you have several options to free up space:
- Delete Unnecessary Data: Review the apps and data categories using the most storage. Delete unnecessary files, photos, videos, or apps that you no longer need.
- Optimize iCloud Photo Library: If your Photos app is taking up a significant amount of space, consider enabling the "Optimize iPhone Storage" option. This will replace full-resolution photos and videos on your device with smaller versions, freeing up storage space while still allowing you to access the original media from iCloud.
- Purchase Additional Storage: If you require more than the free 5 GB of storage, you can upgrade your iCloud storage plan. Apple offers various storage options at different price points, allowing you to choose the plan that best suits your needs.
Backing Up Photos and Videos
Photos and videos often hold significant sentimental value, making it crucial to back them up to ensure they are never lost. iCloud offers several methods to back up your visual memories, including utilizing iCloud Photo Library and optimizing storage.
iCloud Photo Library
iCloud Photo Library is a powerful feature that automatically syncs your photos and videos across all your Apple devices. When enabled, your entire photo and video library are stored in iCloud, making it accessible from any device linked to your iCloud account.
Enabling iCloud Photo Library
To enable iCloud Photo Library, follow these steps:
Step 1: Open Settings
On your iPhone, go to "Settings" and tap on your name at the top of the screen. Then, tap on "iCloud" and select "Photos."
Step 2: Enable iCloud Photo Library
In the "Photos" settings, toggle on the switch next to "iCloud Photo Library." You may be prompted to choose between "Optimize iPhone Storage" and "Download and Keep Originals." Choose the option that suits your preferences and available storage space.
Benefits of iCloud Photo Library
There are several advantages to using iCloud Photo Library for backing up your photos and videos:
- Sync Across Devices: iCloud Photo Library ensures that all your photos and videos are available on all your Apple devices, including iPhone, iPad, Mac, and even Apple TV.
- Storage Optimization: By enabling the "Optimize iPhone Storage" option, iCloud Photo Library automatically manages your device's storage by storing smaller versions of photos and videos locally while keeping the full-resolution versions in iCloud.
- Edit and Share: With iCloud Photo Library, any edits or changes you make to a photo or video on one device are reflected across all your devices. Additionally, you can easily share your photos and videos with others directly from the Photos app.
Optimizing Storage
If you find that your iPhone's storage is running low, you can optimize storage by enabling the "Optimize iPhone Storage" option within iCloud Photo Library. This feature replaces full-resolution photos and videos on your device with smaller versions, freeing up storage space while still allowing you to view and download the original media from iCloud.
Enabling Storage Optimization
To enable storage optimization for iCloud Photo Library, follow these steps:
Step 1: Open Settings
On your iPhone, go to "Settings" and tap on your name at the top of the screen. Then, tap on "iCloud" and select "Photos."
Step 2: Enable Optimize iPhone Storage
In the "Photos" settings, toggle on the switch next to "Optimize iPhone Storage." Once enabled, your device will automatically manage its storage by storing smaller versions of photos and videos locally.
Benefits of Storage Optimization
Enabling storage optimization for iCloud Photo Library offers several benefits:
- More Available Storage: By replacing full-resolution media with smallerversions, storage optimization frees up valuable space on your iPhone, allowing you to store more photos and videos without worrying about running out of storage.
- Faster Loading Times: Smaller versions of photos and videos take up less space and load faster, ensuring a smooth browsing experience in the Photos app.
- Seamless Access to Originals: Even though your device stores optimized versions of your media, you can still access the original, full-resolution versions at any time. Simply tap on a photo or video, and it will download the original from iCloud.
Backing Up Contacts, Calendars, and Reminders
Your contacts, calendars, and reminders are essential aspects of your daily life. Losing this information can be highly inconvenient and disruptive. Fortunately, iCloud allows you to easily back up and restore these critical data sets.
Enabling Contact, Calendar, and Reminder Backup
By default, iCloud automatically backs up your contacts, calendars, and reminders. To ensure that these data sets are included in your backups, follow these steps:
Step 1: Open Settings
On your iPhone, go to "Settings" and tap on your name at the top of the screen. Then, tap on "iCloud."
Step 2: Enable Contacts, Calendars, and Reminders
In the "iCloud" settings, ensure that the toggle switches next to "Contacts," "Calendars," and "Reminders" are turned on. This enables iCloud Backup to include these data sets in your backups.
Benefits of Contact, Calendar, and Reminder Backup
Backing up your contacts, calendars, and reminders with iCloud offers several advantages:
- Seamless Data Transfer: When setting up a new iPhone or restoring your device from a backup, iCloud ensures that your contacts, calendars, and reminders are seamlessly transferred to the new device without the need for manual data entry.
- Sync Across Devices: With iCloud, any changes or additions you make to your contacts, calendars, or reminders are automatically synced across all your Apple devices, ensuring that you have the most up-to-date information at all times.
- Data Recovery: In case of accidental deletion or device failure, iCloud backups act as a safety net, allowing you to restore your contacts, calendars, and reminders to a previous state.
Backing Up Messages and Conversations
Messages often contain valuable information, sentimental conversations, and important details. It's crucial to back up your messages and conversations to ensure that they are preserved and easily accessible. iCloud provides a seamless way to backup and restore your messages on your iPhone.
Enabling Message Backup
iCloud automatically includes your messages in your device backups. To confirm that message backup is enabled, follow these steps:
Step 1: Open Settings
On your iPhone, go to "Settings" and tap on your name at the top of the screen. Then, tap on "iCloud."
Step 2: Enable Messages
In the "iCloud" settings, ensure that the toggle switch next to "Messages" is turned on. This ensures that your messages are backed up and can be restored when needed.
Benefits of Message Backup
Backing up your messages with iCloud offers several benefits:
- Preservation of Conversations: By backing up your messages, you can preserve meaningful conversations, sentimental exchanges, and important details that may be lost if not properly backed up.
- Seamless Transition to New Device: When setting up a new iPhone or restoring from a backup, iCloud ensures that your messages are seamlessly transferred to the new device, allowing you to pick up where you left off without missing any important conversations.
- Data Recovery: In case of accidental deletion or device failure, iCloud backups act as a safety net, allowing you to restore your messages to a previous state and retrieve any important information or attachments.
Backing Up App Data
Many apps on your iPhone store valuable data, including game progress, notes, documents, and settings. It's essential to back up this app data to ensure that you can easily restore it when setting up a new device or in the event of data loss.
iCloud Backup for App Data
iCloud Backup automatically includes app data in your device backups, ensuring that your app settings and data are preserved. However, it's important to note that not all apps are compatible with iCloud Backup, and some may require additional steps to ensure their data is backed up.
Checking App Compatibility
To confirm whether an app's data is included in your iCloud backups, follow these steps:
Step 1: Open Settings
On your iPhone, go to "Settings" and tap on your name at the top of the screen. Then, tap on "iCloud."
Step 2: Manage Storage
In the "iCloud" settings, select "Manage Storage," and then tap on "Backups."
Step 3: View App List
In the "Backups" section, you will see a list of apps that are included in your iCloud backups. Scroll through the list to check if the specific app you want to back up is listed.
Backing Up App Data for Compatible Apps
For apps that are compatible with iCloud Backup, their data is automatically included in your device backups. However, it's important to ensure that the app is set up to use iCloud for data storage. Follow these steps to confirm and enable iCloud backup for compatible apps:
Step 1: Open Settings
On your iPhone, go to "Settings" and scroll down to find the specific app you want to back up.
Step 2: Check iCloud Settings
In the app's settings, look for any options related to iCloud or data backup. Enable any toggle switches or options that allow the app to use iCloud for data storage.
Benefits of App Data Backup
Backing up your app data with iCloud offers several advantages:
- Seamless Transition to New Device: When setting up a new iPhone or restoring from a backup, iCloud ensures that your app data is seamlessly transferred to the new device, allowing you to continue using your apps without losing progress, settings, or important data.
- Data Recovery: In case of accidental deletion, device failure, or the need to reinstall an app, iCloud backups provide a safety net, allowing you to restore your app data to a previous state.
- Easy Setup on Multiple Devices: If you have multiple devices, enabling iCloud backups for compatible apps allows you to set up new devices quickly and easily, as your app data is automatically restored from your iCloud backup.
Automating iCloud Backups
Remembering to manually back up your iPhone regularly can be a hassle. Fortunately, iCloud allows you to automate the backup process, ensuring that your data is always up to date without requiring any manual intervention.
Enabling Automatic iCloud Backups
To enable automatic iCloud backups on your iPhone, follow these steps:
Step 1: Open Settings
On your iPhone, go to "Settings" and tap on your name at the top of the screen. Then, tap on "iCloud."
Step 2: Enable iCloud Backup
In the "iCloud" settings, tap on "iCloud Backup" and toggle on the switch next to "iCloud Backup." This ensures that your device automatically backs up to iCloud when connected to Wi-Fi and charging.
Benefits of Automatic iCloud Backups
Automating iCloud backups offers several benefits:
- Convenience: With automatic backups, you don't have to remember to manually back up your iPhone regularly. The backup process occurs seamlessly in the background whenever your device is connected to Wi-Fi and charging.
- Up-to-Date Data: Automatic backups ensure that your data is always current. Any changes or additions to your device's data are captured in the next backup, ensuring that you can easily restore the most recent version of your data if needed.
- Peace of Mind: By enabling automatic iCloud backups, you can have peace of mind knowing that your valuable data is continuously protected. In case of unexpected incidents or device failure, you can easily restore your data to a new device without losing any important information.
Restoring from an iCloud Backup
In the unfortunate event of losing your iPhone, upgrading to a new device, or needing to restore your device to a previous state, iCloud backup allows you to easily restore your data. The process of restoring from an iCloud backup is straightforward and ensures that your device is set up exactly as it was when the backup was created.
Restoring from an iCloud Backup
Before restoring from an iCloud backup, ensure that you have a recent backup available in your iCloud account. Follow these steps to restore your iPhone from an iCloud backup:
Step 1: Erase Your Device
On your iPhone, go to "Settings" and tap on "General." Scroll down and select "Reset," then choose "Erase All Content and Settings." This will eraseall data and settings on your device, preparing it for the restoration process.
Step 2: Set Up Your Device
After erasing your device, you will be prompted to set it up as a new device or restore from a backup. Select the option to "Restore from iCloud Backup."
Step 3: Sign in to iCloud
Enter your Apple ID and password to sign in to your iCloud account.
Step 4: Choose Backup
From the list of available backups, select the most recent one that you want to restore from. This will initiate the restoration process, which may take some time depending on the size of the backup and the speed of your internet connection.
Step 5: Complete the Setup
Once the restoration process is complete, follow the on-screen instructions to complete the setup of your iPhone. This may include signing in to your Apple ID, setting up Touch ID or Face ID, and choosing your preferences.
Benefits of Restoring from an iCloud Backup
Restoring from an iCloud backup offers several advantages:
- Time and Effort Saving: By restoring from an iCloud backup, you can quickly set up your new device or restore your device to a previous state without manually transferring data or configuring settings.
- Complete Data Restoration: The restoration process ensures that all your data, including contacts, messages, photos, app data, and settings, is brought back exactly as it was when the backup was created.
- Seamless Transition: Restoring from an iCloud backup allows for a seamless transition to a new device or a smooth recovery from a device failure. Your device will be set up with your preferred settings and personalized data, making it feel familiar and ready for immediate use.
Troubleshooting iCloud Backup Issues
While iCloud Backup is generally a reliable and efficient method for backing up your iPhone, occasional issues may arise that can hinder the backup process. Understanding common troubleshooting steps can help you overcome these hurdles and ensure the successful completion of your backups.
Check Internet Connection
One of the primary requirements for iCloud Backup is a stable and reliable internet connection. If your backups are failing or taking an unusually long time to complete, check your Wi-Fi or cellular data connection. Ensure that you have a strong and stable connection before initiating the backup process.
Check iCloud Storage
If your iCloud storage is full, your iPhone may not be able to complete the backup process. Check your iCloud storage usage and consider deleting unnecessary files or purchasing additional storage if needed. Freeing up space in your iCloud account can resolve backup issues caused by insufficient storage.
Update Your iPhone
Keeping your iPhone's software up to date is crucial for optimal performance, including the iCloud Backup process. Make sure that your iPhone is running the latest version of iOS by going to "Settings," selecting "General," and tapping on "Software Update." If an update is available, follow the prompts to install it.
Restart Your iPhone
Restarting your iPhone can resolve temporary glitches or issues that may be preventing the backup process from completing. Press and hold the power button until the "Slide to Power Off" option appears. Slide it to turn off your iPhone, then press and hold the power button again to turn it back on.
Reset iCloud Settings
If you are experiencing persistent issues with iCloud Backup, you can try resetting your iCloud settings. Note that this will sign you out of iCloud on your device, so make sure you know your Apple ID and password before proceeding. Go to "Settings," tap on your name, select "iCloud," and tap on "Sign Out." After signing out, sign back in with your Apple ID and reconfigure your iCloud settings.
Contact Apple Support
If you have tried the above troubleshooting steps and are still experiencing issues with iCloud Backup, it may be helpful to contact Apple Support for further assistance. They can provide personalized guidance and help resolve any technical problems that may be affecting your backup process.
In conclusion, backing up your iPhone with iCloud is an essential practice to protect your valuable data. By following the steps and tips outlined in this guide, you can ensure that your memories, contacts, messages, app data, and other important information are safe and easily recoverable. Don't wait for a mishap to occur; take action today to secure your iPhone data with iCloud backup. With iCloud, you can have the peace of mind knowing that your data is protected and that you can effortlessly restore it in case of any unexpected events.
Posting Komentar untuk "Backup iPhone with iCloud: The Ultimate Guide for Data Security"